Tutorials
HOW TO INVISIBLY JOIN LINES TOGETHER
HOW TO INVISIBLY JOIN LINES TOGETHER
In this lesson were going to learn how to join lines together and make it look like it is a single line that has been done from start to finish in one go. By the end of this lesson not only will you be able to join lines together but you will also fully understand the principles that make this possible.
So why do we need to learn how to invisibly join lines? Well it may seem obvious but I want to explain it anyway just in case there is anyone that is a little confused as to what I mean. When we’re tattooing a super long line there are two things that can commonly happen. We’re either going to have to stop the line because we need to readjust our tattooing or our stretching hand or, were going to run out of ink and have to top our machine up. Lets say we get half way through the line and then we have to stop for either of those reasons. We will have to stop and restart that line but we don’t want anyone to know or be able to see in any way shape or form that the line has been done in multiple sections, it needs to look like one nice smooth solid consistent line. If we don’t apply what we’re going to cover in this lesson then often you can end up with either a blob of ink at the point of the join or it’s thicker in the area of the join and the line looks inconsistent. If you scroll through the internet and look at tattoos done by your local shops I guarantee, unless all your local artist are tattooing at very high levels, if you look closely enough you will find some of these mistakes. As simple as it sounds it’s not the easiest thing in the world to master. You should all be able to do it to a reasonably good standard from the get go. But are we wanting to just be standard? Is standard where we want to set our goals and ambitions? Defiantly not!
So, how are we going to learn how not to make these mistakes like so many artists out there do. Well, first I want to show you how and why my method of doing this works then as always were going to hammer out some drills to really build up that muscle memory and help you to fully understand the process. We’re still at the beginning of the course but today’s lesson, just like the straight line lesson and the lesson doing lines in different directions, is something that your going to be using day in and day out for the rest of your tattooing career. So, for that reason its pretty important that we get it right. Chill, enjoy the lesson, go grab and nice cup of Yorkshire tea and make sure you have your full attention on the lesson.

Starting and finishing a line
So the first thing that you need to remember is how we need to start and finish a line. Look back at the straight line from the first lesson, this should make perfect sense to you now (image 26). We enter the skin, and as we’re penetrating the skin and getting the correct depth we gradually start to move in the direction of the line at a smooth and consistent speed. As we get to the end of the line we leave the skin in the same manner. Hopefully now you all remember and understand this. When we’re joining a line we do things a little different.
Joining a line
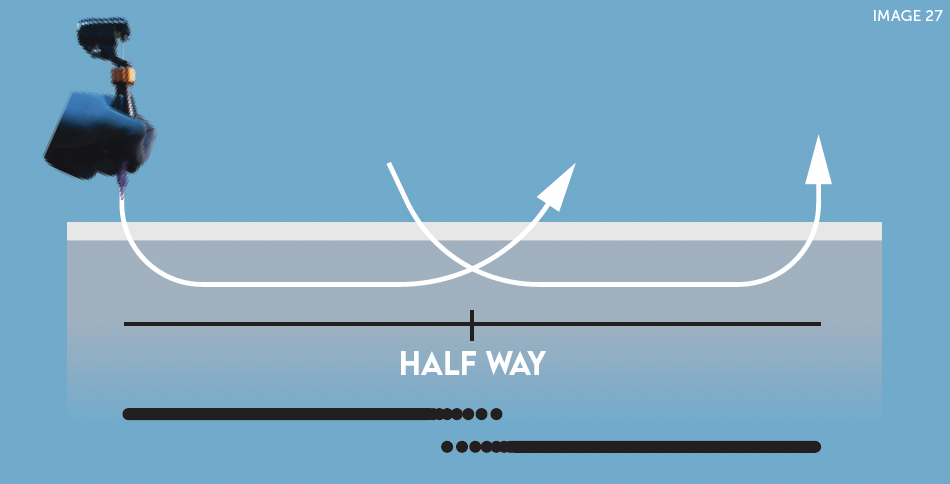
So the stencil for this lesson consists of a number of longer lines. We are going to tattoo the line however when we get around half way we’ll pretend that we’ve either run out of ink or just need to stop to reposition our hand and finish the line. To begin with we will start the line exactly the same way as before then as we’re getting to the middle we will gradually taper out of the skin (image 27). What does this achieve? Remember, we’re essentially creating lots of single dots that overlap to create our line. As we taper the needle out of the skin the ink retained and trapped under the skin gets less and less.
As we joint back into the line to carry on, we don’t start at the end of the previous taper. This time we go back onto the line slightly and aim to start at the point we began to taper out. Then we taper into the skin again and carry on our line to the end finally leaving the skin just as we would with a normal line. You’re aiming for the two tapers to overlap and give you the same consistency of ink as you have on the rest of the line.

Putting it into practice
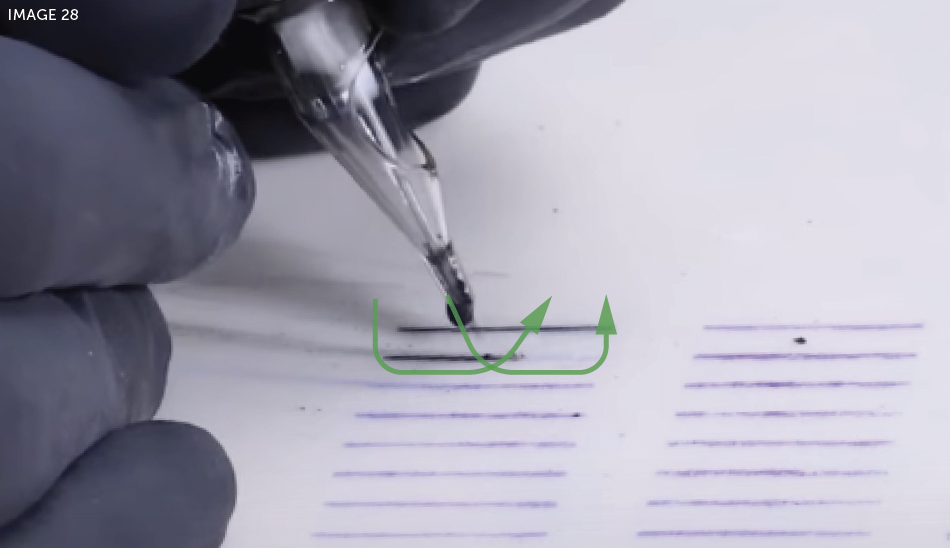
So that’s the theory now it’s time to get our practise stations set up, the stencil on the mats and practice this so that we can really master the art of joining lines without anybody ever guessing that there is a join. You will notice that the lines in this lesson are twice as long as those in lesson one. In theory we would probably be able to tattoo these lines in one pass without having to stop, however, for the purpose of this drill I want you to start the line, get around half way and taper out, then not starting where the needle came out but coming back slightly aiming to start the line at the point we began to taper out (image 28). As you get to the end of the line just come out nice and smooth exactly like we have been doing in the previous lessons. On each one you should be thinking about the join and the position of the tapers and be aiming for a smooth and consistent join.
Go ahead and complete the stencil. Remember to always be thinking about the 5 key skills, and saying what you are doing out loud can really help to get the knowledge into your head. It doesn’t matter if your pushing the line, pulling the lines or going in any direction this method applies every time we join a line.


