Tutorials
EVERYTHING YOU NEED TO KNOW ABOUT TATTOO LINING NEEDLES
HOW TO USE DIFFERENT SIZED ROUND LINING NEEDLES
In this lesson were going to be tattooing with different size lining needles so we can get used to how each one feels different and also learn what we need to do to make sure were adjusting our hand and machine to match the needle were using. So far we have been doing all the lessons with a standard 5 liner. Hopefully at this stage your all starting to feel a little bit more confident with the machine in your
hand. I can clearly remember back to when I was just starting out and yes, of course it’s daunting for a lot of people. I think it’s the same whenever your starting anything new, your all excited and want it to be perfect straight away however lets have it in our heads that the aim of these lessons is to drill the basics and improve. Don’t be expecting perfection instantly because that’s unrealistic. By the end of the course that will be a different story however for now lets focus on enjoying the process and constantly aiming for improvement. So why is it so important to get used to using different sized liners? Well were not always going to be using a 5 liner like we have been in the previous lessons. Depending on the design were trying to create will depend on the liner we use. The important thing to learn is that we will need to change things like angles, machine and or hand speed depending on which size we use. I want you to learn that every time we change something when tattooing it has an affect everything else. By the end of this lesson you will understand the whys and be able to tattoo with any needle because you have a deeper understand of the affects of different sizes.
Firstly let me explain the varying factors so you understand things a little better and then as always were going to get the mats out and do a few little drills to help everything make sense and so you get plenty of time with the machine in your hands.
There are 4 things you need to bear in mind when you change the size of the needle:
1. Surface area + force
2. Machine + Hand Speed
3. Angles
4. Forgiveness
SURFACE AREA AND FORCE
Let’s say we have 4 different sized liners
for example: 3, 5, 9 and 14.
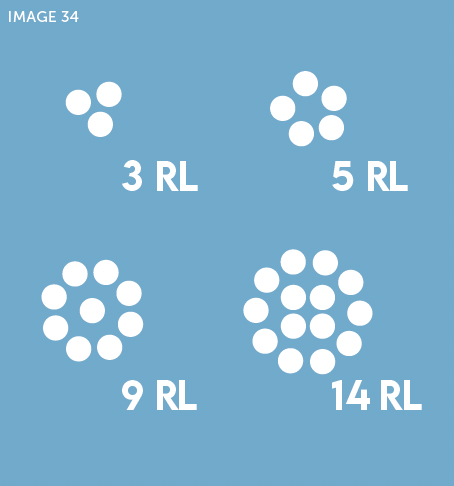
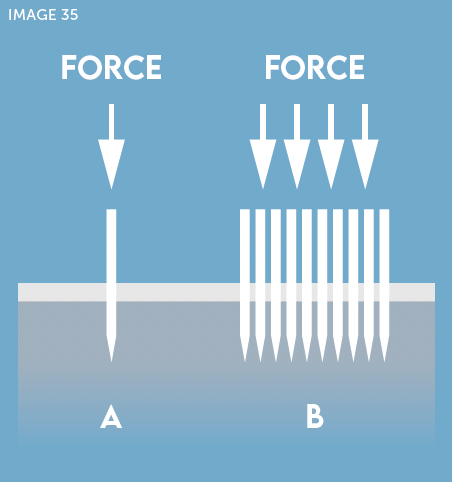
Obviously as we can see the needles get bigger as the number increases (image 34). The more needles there are the more surface area this creates when it makes contact with the skin. Imagine trying to push a single needle into your arm, its going to push in very easily and with very little effort or force required to penetrate and enter then skin. However, if we had a large amount of needles and then tried to push them into the skin at the same time, it would require more force and effort than a single needle. So lets think about how this affects us when tattooing. Let’s say we have our machines running at 5 volts when using a 5 liner. If we then swap to a 14 liner it’s going to require more force to push more needles into the skin and so were going to have to turn up the machine (image 35). I like to think of it like this: A person can lay on a full bed of nails and the nails wouldn’t stick into their skin. That’s because the weight of the person is spread across all the nails and so there is only a small amount of force on each nail. If the same person lay on just one of those nails, well it would just stick straight into them and be just a little bit painful! Don’t get any bright ideas and start laying on nails, trust me just stick to the theory on this one.


HAND AND MACHINE SPEED
THIS IS THE SAME PRINCIPLE WE COVERED IN HOW TO TATTOO STRAIGHT LINES.
If we’re changing the needle and having to speed up or slow down the machine so the needle hits with more or less force then it’s also going to have an effect on the hand speed. Larger needles require more force to push the ink into the skin so we need to slow our hands down a little so the line stays nice and solid. Again this is because there is a larger surface area and so it’s harder to push into the skin. If you are still unsure about hand and machine speed then go back to lesson one where I explain it in detail.
ANGLES
This is important and makes a really big difference when using the larger round needles.
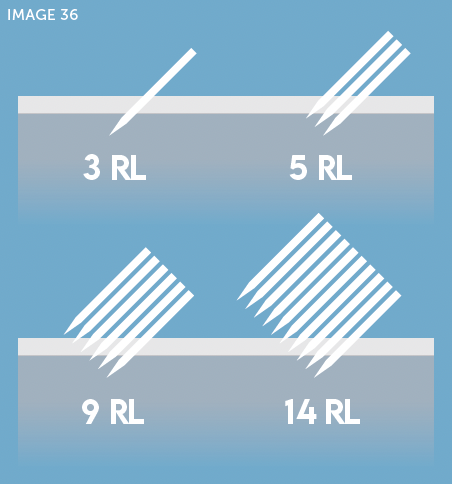
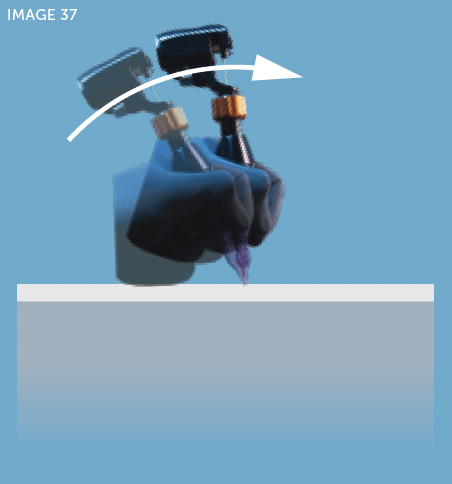
Well lets say we have the 4 different sized needles going into the skin at a slight angle (image 36). We can see that 3 is obviously super thin and the needles get bigger as the numbers increase, I have exaggerated this just for demonstration purposes to help you understand. We can see that they all go to the same depth however look at the 14 liner. The bottom needles are entering the skin and going to the perfect depth but the needles at the top are not even in the skin. So when we’re using large round liners or shaders we need to reduce the angle of the machine (image 37). This means that the needles are more or less all close the right depth. What we don’t want to do is to think “That line doesn’t look solid enough so I’ll just go deeper until it is”. This would mean that the top needles are and the correct depth and the bottom ones would be too deep, you don’t want this to happen! If you go too deep and cause a blow out under the skin and/or scaring to the skin then this is going to cause you huge problems. If a line is a little light or faint then it can always be redone and fixed. You should always err on the side of caution, it’s better to be safe than sorry.


FORGIVENESS
USING NEEDLE SIZE TO HIDE WOBBLY LINES
I have heard loads of different views on this topic across the internet, some are true, some aren’t. I think its pretty obvious that with a small 3 liner you can more easily see a wobble in a line and with larger needles these wobbles are less obvious. I personally think that you can still see a huge difference looking at a tattoo who’s line work is bang on to that of one that is slightly off here and there. I want us to all have the impression that it doesn’t matter what needle were using we should all have the goal of getting every line perfect. I would always advise using between a 5 and 9 liner when your first start out and then as you become more comfortable you can start getting used to the really small and larger needles.
So let’s get into it. Remember: don’t stress and take your time, no pressure at all just enjoy the whole process, we are aiming for improvement not perfection straight away. What were going to do is get used to using different sized liners. I want us to do the drill first, then feel free to print out any of the designs we have done so far stencil them up and practice doing them with different sized liners. So, as before I’m using my Sol Nova Unlimited, with solid black Dynamic ink. This time however I’m going to practice using: 10 03 round liner, a 10 05 round liner, a 10 09 round liner and a 12 14 round liner.
Let’s get cracking with the drill, trying the needles in size order starting off with the 10 03. This drill is the same as the first lesson however the aim here is to get you used to the differences in the needles. You will find that the 10 03 will take very little effort and there will be a lot less vibration. By the time you get to the 12 14 you will notice that it is really sluggish, and there is more resistance and vibration. I’m trying to explain something verbally that is a sensation, but when you try it, it will be clear what I mean. This is all about getting used to the feel of each needle so do as many of these drills as you can and keep swapping the needles.
As we are working on mats these needles can be used multiple times until they are not performing properly. For some people that might be 4 or 5 lessons for some it might be 1 or 2 just depends on how you tattoo and the quality of the needles that you are using. If you make sure that you really clean it out in between you will get a lot more use out of it. What happens is that any ink left in between the individual needles dries and expands which opens the needles up. If you avoid that it can save you money! Obviously on a person we need to use new needles every time, but while were learning on mats we can make it as cost effective as possible. A good thing to do is to do a sheet using all the liners you’ve got then label them, you can then use this for future reference. When you come back to doing a design later on it can help you decide which size is right.

